
Quando si tratta di effettuare selezioni in Photoshop, ci sono davvero due tipi di persone: quelle che sanno come usare lo strumento Penna e quelle che lottano. La maggior parte delle persone rinvia a imparare come usare lo Strumento Penna il più a lungo possibile, mentre altri non riescono mai ad apprenderlo, credendo che sia troppo confuso, troppo complicato e semplicemente innaturale.
Alla fine, il loro lavoro in Photoshop ne risente, poiché sono bloccati a fare affidamento sullo strumento Lazo per quasi tutto ciò che non possono selezionare con gli strumenti Selezione rettangolare o ellittica. In questo tutorial di Adobe Photoshop, metteremo fine alla sofferenza. Impareremo quanto sia facile effettuare selezioni con lo Strumento penna.
Ora, quando dico "facile", non intendo che leggerai questo tutorial e sarai immediatamente trasformato in un Pen Master. Imparare come usare lo strumento penna è molto simile a come andare in bicicletta. Una volta appreso, sembrerà del tutto naturale e ti chiederai come si possa non sapere come usare qualcosa di così semplice. Ma arrivare a quel punto richiede un po 'di pratica e sforzo, e mentre leggi ogni libro che c'è su come andare in bicicletta può insegnarti i fondamenti di come funzionano i pedali, le marce e i freni, non è fino a quando non sei in bicicletta che lotta per mantenere l'equilibrio che inizia il vero apprendimento.
Una delle grandi cose dello strumento penna è che non è qualcosa che è esclusivo di Photoshop. Lontano da esso! Praticamente ogni popolare programma di fotoritocco, grafica e layout di pagina utilizza lo strumento Penna in un modo o nell'altro, quindi una volta che hai imparato come usarlo in Photoshop, avrai già una buona conoscenza di come usarlo in molti anche altri programmi!
Dove trovo lo strumento penna?
Prima di iniziare a parlare di cosa sia lo strumento Penna o come usarlo, dovremmo prima cercare dove trovarlo in Photoshop. Lo strumento Penna si trova nella palette Strumenti, raggruppati con gli strumenti Forma, lo strumento Testo e gli strumenti Selezione tracciato (freccia bianca) e Selezione diretta (freccia nera) (vedere l'immagine a sinistra).
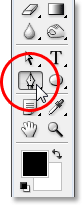
Strumento penna di Photoshop
Naturalmente, questo può sollevare la questione del perché, se possiamo effettuare selezioni con lo strumento Penna, non è raggruppato con gli altri strumenti di selezione (lo strumento Selezione rettangolare, lo Strumento selezione ellittica, lo strumento Lazo, ecc.) la parte superiore della palette Strumenti? Perché è laggiù con quegli altri strumenti che chiaramente non sono strumenti di selezione?
Questa è una domanda eccellente, e sembra che ci sia una risposta altrettanto eccellente da seguire, che ci arriveremo tra un momento.
Perché si chiama lo strumento "Penna"?
Uno dei primi ostacoli per imparare a usare lo Strumento Penna, come con molte altre cose in Photoshop, è il suo nome, dal momento che, dopo tutto, se c'è una cosa che chiunque abbia mai provato ad usarlo sa, questa cosa non è un penna. Almeno, non il tipo di penna che normalmente pensi quando ascolti la parola "penna". Prova a scrivere il tuo nome con esso nello stesso modo in cui potresti firmare il tuo nome su un pezzo di carta con una penna e probabilmente finirai con un pasticcio contorto e aggrovigliato e cose che si avvolgono l'una sull'altra (ovviamente, suppongo che potrebbe benissimo essere come firmi il tuo nome).
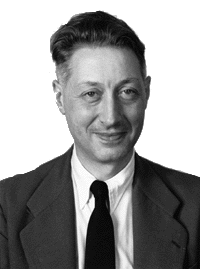 Pierre Bezier
Quindi, se non si comporta come una penna tradizionale, perché viene chiamato lo strumento penna? Lo strumento penna è stato effettivamente chiamato diverse cose nel corso degli anni, e con ciò non intendo il tipo di cose che potresti aver chiamato in momenti di frustrazione. Potresti averlo sentito chiamare la Bezier Pen o lo strumento Bezier, e questo perché è stato creato da un uomo di nome Pierre Bezier (che è lui a sinistra), un ingegnere francese e un ragazzo intelligente che ha inventato il matematica elaborata che alimenta lo strumento mentre lavora per l'azienda automobilistica Renault (lo strumento penna è stato originariamente creato per aiutare a progettare auto).
Potresti anche aver sentito lo strumento Penna indicato come Strumento tracciati, e questo è davvero il nome più appropriato per esso. Lo strumento Penna si basa sul disegno di "tracciati". Per effettuare selezioni con lo strumento Penna, convertiamo semplicemente il tracciato oi tracciati che abbiamo disegnato in selezioni. Comincia sempre, comunque, con un percorso.
Plug-in codici brevi, azioni e filtri: errore nello shortcode (ads-basics-middle-2)
Cos'è un percorso?
Un "percorso" è, onestamente, qualcosa che può sembrare un po 'fuori posto all'interno di un programma come Photoshop. Il motivo è perché Photoshop è principalmente un programma basato su pixel . Prende milioni di minuscoli pixel quadrati che compongono una tipica immagine digitale e fa le cose con loro. I tracciati, d'altra parte, non hanno assolutamente nulla a che fare con i pixel, motivo per cui ho detto che potrebbero sembrare fuori posto in un programma che viene utilizzato principalmente per la modifica e il disegno di pixel.
Un percorso non è altro che una linea che va da un punto all'altro, una linea completamente indipendente e che non si preoccupa dei pixel sottostanti. La linea può essere diritta o può essere curva, ma va sempre da un punto all'altro e, come ho già detto, non ha nulla a che fare con i pixel dell'immagine. Un percorso è completamente separato dall'immagine stessa. In effetti, un percorso è così separato che se si tenta di stampare l'immagine con un percorso visibile sullo schermo, il percorso non verrà visualizzato sul foglio. Inoltre, se hai salvato l'immagine come file JPEG.webp e l'hai caricata su un sito Web, anche se hai salvato l'immagine con il percorso visibile sullo schermo in Photoshop, non la vedrai nell'immagine sul sito Web. I percorsi sono solo per i tuoi occhi e Photoshop. Nessun altro li vedrà mai, a meno che non passino davanti al computer mentre lavori.
Abbiamo sempre bisogno di un minimo di due punti per creare un tracciato, dal momento che dobbiamo sapere dove inizia e dove finisce. Se utilizziamo abbastanza punti da poter riportare il nostro percorso nello stesso punto da cui è iniziato, possiamo creare forme diverse dai percorsi, che è esattamente il modo in cui funzionano i vari strumenti Shape di Photoshop. Lo strumento Rettangolo utilizza tracciati, collegati da punti, per disegnare una forma rettangolare. Lo strumento Ellisse utilizza tracciati, collegati da punti, per disegnare una forma ellittica e così via. È anche il modo in cui funziona lo strumento testo di Photoshop, sebbene Photoshop gestisca i caratteri in modo leggermente diverso rispetto a quelli delle forme regolari, ma tutto il tipo di Photoshop è essenzialmente costituito da tracciati. In effetti, puoi convertire il tipo in forme, che ti offre tutte le stesse opzioni di modifica del percorso con il tipo che ottieni quando lavori con le forme.
Potresti anche aver sentito percorsi chiamati contorni, e questa è una descrizione abbastanza buona di ciò che un percorso è, o almeno, quello che può essere un percorso. Possiamo tracciare un tracciato quadrato e se non facciamo nient'altro con esso, poiché non lo riempiamo di un colore o non applichiamo un tratto, allora tutto ciò che abbiamo è un contorno di base di un quadrato. Lo stesso con un cerchio o qualsiasi altra forma che disegniamo. Il percorso stesso è solo il contorno della forma. Solo quando facciamo qualcosa con il tracciato, come riempirlo, applicare un tratto o convertirlo in una selezione, il tracciato diventa effettivamente qualcosa di più di un semplice contorno.
È possibile selezionare un intero percorso utilizzando lo strumento Selezione tracciato (noto anche come lo strumento "freccia nera") oppure è possibile selezionare singoli punti o segmenti di tracciato utilizzando lo strumento Selezione diretta (lo strumento "freccia bianca"). Un "segmento" di percorso, o "segmento di linea", come viene talvolta chiamato, è qualsiasi percorso tra due punti. Un percorso rettangolare, ad esempio, sarebbe composto da quattro punti (uno in ciascun angolo), e i singoli percorsi che collegano i punti lungo la parte superiore, inferiore, sinistra e destra per creare la forma del rettangolo sono i segmenti del percorso . Il percorso effettivo stesso è la combinazione di tutti i singoli segmenti del percorso che compongono la forma.
Questo può essere un po 'confuso, quindi vediamo cosa intendo. Apri un nuovo documento all'interno di Photoshop. Non importa che taglia abbia. Sceglierò la dimensione 640x480 dall'elenco dei preset, ma come ho già detto, non importa quale dimensione scegli. Seleziona il tuo strumento penna dalla palette Strumenti. Puoi anche selezionare lo strumento Penna semplicemente premendo la lettera P sulla tastiera.
Le due modalità dello strumento penna
Ora, prima di continuare, dobbiamo prima assicurarci di lavorare con i percorsi, e questo perché lo Strumento penna in realtà ha due diverse modalità in cui può funzionare e, per impostazione predefinita, utilizza l'altra. Con lo strumento penna selezionato, se guardiamo in alto nella barra delle opzioni nella parte superiore dello schermo, vedremo un gruppo di tre icone:

La barra delle opzioni in Photoshop che mostra il gruppo di tre icone che rappresentano ciascuna delle tre modalità dello strumento penna.
So di aver detto che ci sono due modalità in cui lo strumento Penna può funzionare e, tuttavia, come per rendere le cose più confuse, ci sono tre icone, ma l'icona a destra, che è l'icona Riempi pixel, è disattivata e non disponibile quando si lavora con lo strumento penna. È disponibile solo quando si lavora con i vari strumenti Forma, quindi ci sono solo due icone che dobbiamo guardare.
L'icona a sinistra è l'icona Livelli forma, nota anche come "non quella che vogliamo", ed è quella selezionata per impostazione predefinita. Se dovessimo lavorare con lo strumento penna con quell'icona selezionata, disegneremmo forme, proprio come se stessimo usando uno dei vari strumenti forma, tranne che invece di disegnare una forma predefinita come un rettangolo o un'ellisse, noi potremmo disegnare qualsiasi forma volessimo. Come ho detto però, non è quello che vogliamo. Vogliamo l'icona accanto ad essa, l'icona Percorsi, quindi vai avanti e fai clic su di essa per selezionarla:

Photoshop Tutorial: fai clic sull'icona "Percorsi" nella barra delle opzioni per lavorare con i percorsi con lo strumento Penna.
Con lo strumento Penna selezionato e l'icona Tracciati selezionati nella barra delle opzioni, fai clic una volta in qualsiasi punto del documento. Non fare clic e trascinare, basta fare clic. Quando lo fai, aggiungerai un piccolo punto quadrato. L'ho ingrandito qui:

Fare clic una volta all'interno del documento con lo strumento Penna per aggiungere un punto.
Questo primo punto che abbiamo appena aggiunto è il punto di partenza del nostro percorso. Al momento, in realtà non abbiamo un percorso. Tutto ciò che abbiamo è un punto di partenza. Il "punto" è tecnicamente chiamato un punto di ancoraggio o punto di ancoraggio, e viene chiamato così perché fissa il percorso in posizione. Questo primo punto ancorerà l'inizio del percorso verso questo punto all'interno del documento. Man mano che aggiungiamo più punti, ognuno di essi ancorerà il percorso in posizione in quella posizione.
Aggiungiamo un altro punto. Fai clic altrove all'interno del documento. Ovunque lo farà. Ho intenzione di fare clic da qualche parte a destra del mio punto iniziale:

Tutorial di Photoshop: aggiungi un secondo punto di ancoraggio facendo clic in un'altra posizione all'interno del documento.
Ora ho aggiunto un secondo punto di ancoraggio e guarda cosa è successo. Ora ho una linea retta che unisce i due punti! Quella retta è la mia strada. Come ho accennato in precedenza, abbiamo bisogno di un minimo di due punti per creare un percorso, poiché dobbiamo sapere dove inizia e dove finisce il percorso e ora che abbiamo sia un punto iniziale che uno finale, Photoshop è stato in grado di collegare due punti insieme, creando il nostro percorso.
Aggiungiamo qualche punto in più solo per divertimento. Fai clic qualche volta in più punti diversi all'interno del documento. Ancora una volta, non fare clic e trascinare, basta fare clic su:
Aggiungi ulteriori punti facendo clic in punti diversi all'interno del documento.
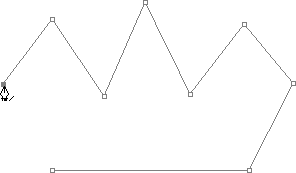
Nell'immagine sopra, ho aggiunto altri sette punti di ancoraggio facendo clic in punti diversi con lo strumento Penna e ogni volta che ne ho aggiunto uno, la lunghezza del mio percorso è aumentata perché è stato aggiunto un nuovo "segmento" tra il punto precedente e il nuovo punto. Il mio percorso ora consiste di nove punti di ancoraggio e otto segmenti di percorso. Potrei continuare a fare clic all'interno del documento per aggiungere altri punti di ancoraggio e segmenti di tracciato, ma ciò che mi piacerebbe davvero fare ora è chiudere il mio percorso in modo da formare una forma completa.
Chiusura di un percorso
Per chiudere un percorso, tutto ciò che dobbiamo fare è fare nuovamente clic sul nostro punto di partenza iniziale. Quando passi il cursore del mouse sul punto iniziale, vedrai apparire un piccolo cerchio nell'angolo in basso a destra dell'icona della penna:

Un piccolo cerchio appare nell'angolo in basso a destra dell'icona della penna quando si posiziona il cursore sul punto iniziale iniziale del percorso.
Quel cerchio ci dice che stiamo per diventare "cerchio completo" con il nostro percorso, finendo da dove è iniziato. Per chiuderlo, è sufficiente fare clic direttamente sul punto iniziale.
Di seguito possiamo vedere che il mio percorso è diventato un percorso chiuso ed è ora un contorno di base di una forma:
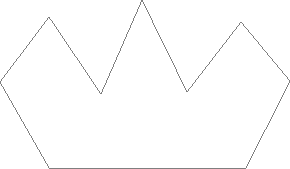
Il percorso è ora chiuso, terminando nel punto iniziale, creando un percorso chiuso.
Anche se questo percorso è stato disegnato solo per divertimento come esempio di come disegnare un percorso di base con lo strumento Penna, posso facilmente trasformare questo percorso in una selezione. Per questo, abbiamo bisogno della palette Percorsi di Photoshop, e vedremo dopo.
Trasformare un percorso in una selezione
Finora, abbiamo esaminato cos'è un percorso e come disegnare un percorso di base con lo strumento penna di Photoshop. Ma come si fa a fare una selezione dal percorso?
Facile! Ci sono un paio di modi per trasformare un percorso in una selezione, inclusa una comoda scorciatoia da tastiera, ma prima di dare un'occhiata al modo rapido, diamo un'occhiata al modo ufficiale. Il "modo ufficiale" prevede l'uso della palette Percorsi di Photoshop, che troverai raggruppati con la palette Livelli e la palette Canali:
Tavolozza dei percorsi di Photoshop.
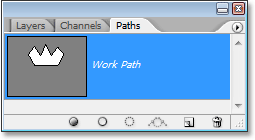
A prima vista, la palette Tracciati è molto simile alla palette Livelli di Photoshop e Adobe lo ha intenzionalmente reso così così ti sentirai più a tuo agio nell'usarlo. Possiamo vedere un'anteprima in miniatura della forma del percorso che abbiamo appena creato e, per impostazione predefinita, Photoshop nomina il percorso "Percorso di lavoro", che è fondamentalmente un modo elegante di dire "temporaneo", come se si dovesse creare un diverso percorso ora senza rinominare questo percorso in qualcos'altro prima, questo verrebbe sostituito dal nuovo percorso. Puoi avere un solo "Percorso di lavoro", quindi se vuoi mantenerlo, devi fare doppio clic sul suo nome nella palette Tracciati e nominarlo in altro modo prima di creare un nuovo percorso.
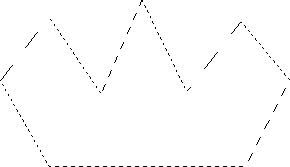
Poiché il mio percorso assomiglia un po 'a una corona, ho intenzione di fare doppio clic sul nome "Percorso di lavoro", che con il richiamo della finestra di dialogo Salva percorso di Photoshop, e rinominerò il mio percorso "Corona":

È possibile salvare un "Percorso di lavoro" temporaneo semplicemente rinominandolo.
Al termine, farò clic su OK e ora, se guardo di nuovo nella palette Tracciati, riesco a vederlo con certezza, il mio "Percorso di lavoro" è stato rinominato "Corona":
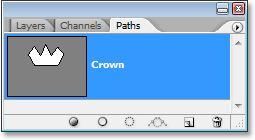
La palette Paths mostra che il percorso è stato rinominato "Crown".
Rinominandolo, il percorso viene ora salvato e non scomparirà su di me se vado a creare un nuovo percorso. Inoltre, tutti i percorsi salvati vengono salvati con il documento Photoshop, quindi ora, se salvo il mio documento, il percorso verrà salvato con esso e la prossima volta che apro il documento, il percorso sarà ancora presente nella palette Percorsi.
Salvare un percorso non è qualcosa che devi fare per trasformarlo in una selezione. Nella maggior parte dei casi quando si utilizza lo strumento Penna per effettuare le selezioni, non sarà necessario il percorso una volta effettuata una selezione da esso, quindi non sarà necessario salvarlo. Se volevi salvarlo, basta rinominarlo in qualcosa di diverso da "Percorso di lavoro" ed è salvato.
Per trasformare il tracciato in una selezione, se guardiamo in fondo alla palette Tracciati, possiamo vedere diverse icone. Queste icone ci consentono di fare cose diverse con il nostro percorso. La prima icona a sinistra è l'icona Riempi il percorso con il colore di Primo piano e, come suggerisce il nome, facendo clic su di essa riempirà il nostro percorso con il nostro colore di Primo piano corrente. Interessante, ma non è quello che vogliamo. La seconda icona da sinistra è il tracciato con l'icona del pennello, che applicherà un tratto al nostro tracciato usando qualsiasi pennello attualmente selezionato.
Questo è un ottimo modo per creare effetti interessanti in Photoshop, ma per quello che stiamo facendo qui, trasformando un percorso in una selezione, non è nemmeno quello che vogliamo. Quello che vogliamo è la terza icona da sinistra, il percorso di caricamento come icona di selezione:
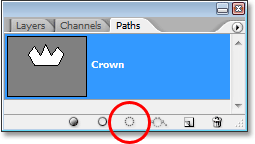
L'icona "Carica tracciato come selezione" nella parte inferiore della palette Tracciati.
Non appena faccio clic su questa icona, il mio percorso all'interno del mio documento diventa una selezione, come se l'avessi creato usando uno degli strumenti di selezione più comuni di Photoshop:
Il percorso è stato ora convertito in una selezione.
È così facile! In effetti, è anche più facile di così perché c'è una scorciatoia da tastiera per trasformare un tracciato in una selezione senza dover passare affatto alla palette Tracciati. Quando hai tracciato il tuo percorso e sei pronto a trasformarlo in una selezione, premi semplicemente Ctrl + Invio (Win) / Comando + Invio (Mac) per fare in modo che Photoshop converta il percorso in una selezione.
Ormai potrebbe essere un po 'più ovvio per te perché, anche se lo Strumento penna è molto uno strumento di selezione, non è raggruppato con gli altri strumenti di selezione nella parte superiore della palette Strumenti. Il motivo è perché lo strumento Penna è principalmente uno strumento tracciato. Crea selezioni creando prima i tracciati e, per questo motivo, ha più cose in comune con i vari strumenti Forma e lo strumento Testo, che usano tutti i tracciati, rispetto a quelli con gli strumenti di selezione di base come lo strumento Selezione rettangolare o Lazo Strumento, che effettua selezioni basate solo su pixel.
Diamo un'occhiata a un esempio pratico di ciò che abbiamo imparato finora. Qui abbiamo una foto di un segnale di stop davanti ad alcune scogliere rocciose:

Una foto di un segnale di stop.
Diciamo che volevo selezionare quel segnale di stop in modo da poterlo copiare sul proprio livello. Il segnale di stop è costituito da nient'altro che una serie di linee rette, che renderà questo estremamente facile. Innanzitutto, ho bisogno di un punto di partenza per il mio percorso, quindi inizierò nell'angolo in alto a sinistra del segno facendo clic una volta per posizionare un punto di ancoraggio iniziale. In questo caso, non importa da dove comincio il percorso, ma inizierò nell'angolo in alto a sinistra:
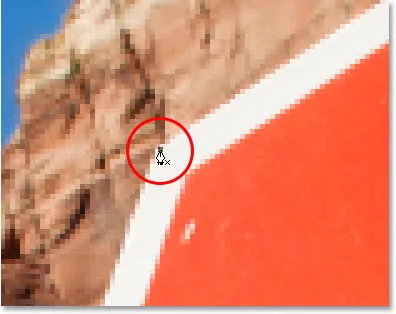
Facendo clic una volta nell'angolo in alto a sinistra del segnale di stop per iniziare il percorso con un punto di ancoraggio iniziale.
Notate come sono ingrandito qui mentre clicco. Lo troverai più facile quando effettui le selezioni con lo strumento Penna per ingrandire leggermente l'immagine. In questo modo, puoi essere sicuro di mantenere il tuo percorso all'interno dell'area che desideri selezionare.
In questo momento, non ho un percorso, ho solo un punto di partenza per il mio percorso. Per creare il percorso, tutto ciò che devo fare è aggirare il segno aggiungendo un punto di ancoraggio in ogni angolo in cui il percorso deve cambiare direzione. Quando aggiungo ciascun punto di ancoraggio, apparirà un nuovo segmento di tracciato che unisce il punto di ancoraggio precedente con quello nuovo, finché non avrò fatto il giro del segno. Per chiudere il percorso, farò semplicemente clic sul punto iniziale iniziale. È un po 'difficile da vedere nello screenshot qui sotto, ma ora ho un percorso attorno all'intero segnale di stop, incluso il post a cui è collegato, semplicemente facendo clic negli angoli in cui il percorso deve cambiare direzione:

Un tracciato ora appare attorno al segnale di stop nell'immagine.
Se guardo ora nella mia palette Tracciati, posso vedere chiaramente che ho un tracciato a forma di segnale di stop:
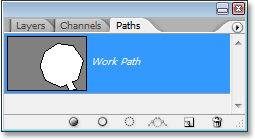
Tavolozza Percorsi di Photoshop che mostra il tracciato attorno al segnale di stop.
Nota come Photoshop ha chiamato il percorso "Percorso di lavoro", il che significa che questo percorso è temporaneo e lo perderò se creo un percorso diverso senza prima salvarlo rinominandolo. Anche se non creo un nuovo percorso, lo perdo comunque quando chiudo il documento a meno che non lo salvi prima. Non ho bisogno di salvare questo percorso, quindi non mi preoccuperò. Nella maggior parte dei casi, non dovrai nemmeno preoccuparti di questo.
Per convertire il mio percorso in una selezione, farò clic su Carica percorso come icona di selezione nella parte inferiore della palette Livelli, oppure potrei anche premere Ctrl + Invio (Win) / Comando + Ritorno (Mac) con la stessa facilità:
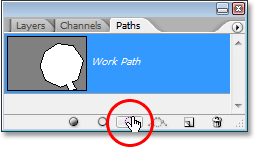
Fare clic sull'icona "Carica percorso come selezione" nella palette Percorsi o premere "Ctrl + Invio" (Win) / "Comando + Elimina" (Mac) per convertire il percorso in una selezione.
Non appena lo faccio, il mio percorso viene convertito in una selezione e il segnale di stop è ora selezionato:

Il segnale di stop è ora selezionato dopo aver convertito il percorso in una selezione.
Tornerò alla palette Livelli e per copiare il segnale di stop sul proprio livello, userò la scorciatoia da tastiera Ctrl + J (Win) / Command + J (Mac), che posiziona il segno da solo livello sopra il livello Sfondo:
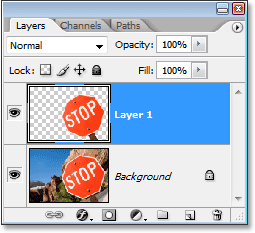
Il segnale di stop è stato ora copiato sul suo livello separato.
Con il segno ora sul suo livello, posso fare tutto ciò che mi piace, scambiare lo sfondo con un'immagine diversa o rendere lo sfondo bianco e nero lasciando il segno a colori, qualunque cosa io possa pensare. Il punto è che sono stato in grado di selezionare facilmente il segno facendo clic negli angoli con lo strumento Penna, che ha creato un tracciato attorno al segno, quindi ho semplicemente convertito il tracciato in una selezione.
Finora nel nostro sguardo su come effettuare selezioni con lo strumento Penna in Photoshop, abbiamo imparato che la penna è uno strumento di selezione in quanto gli strumenti di selezione più comuni di Photoshop come il Rettangolo rettangolare e gli strumenti Lazo, ma che invece di effettuare selezioni basate sui pixel come fanno quegli altri strumenti, lo strumento Penna disegna percorsi che possono quindi essere facilmente convertiti in selezioni, dalla palette Tracciati o usando la scorciatoia da tastiera rapida.
Ecco perché la penna non si trova nella parte superiore della palette Strumenti con quegli altri strumenti di selezione basati su pixel, ma è invece raggruppata con gli strumenti tracciato, come i vari strumenti Forma, lo strumento Testo e gli strumenti Selezione tracciato e Selezione diretta . Lo strumento Penna è tutto sui tracciati, non sui pixel.
Abbiamo imparato che possiamo aggiungere punti di ancoraggio all'interno del nostro documento, che ancorano il tracciato in posizione, semplicemente facendo clic in punti diversi con lo strumento Penna e, quando aggiungiamo sempre più punti di ancoraggio, creiamo un tracciato come ogni nuovo punto è collegato al punto precedente da un nuovo segmento di percorso. Abbiamo anche appreso che un percorso è ciò che viene generalmente chiamato "non elemento di stampa", il che significa che, indipendentemente da quanti percorsi aggiungiamo, nessuno di essi sarà visibile sul foglio quando andiamo a stampare l'immagine . Inoltre, non saranno visibili se visualizziamo l'immagine su un sito Web. I percorsi sono visibili solo a noi quando lavoriamo all'interno di Photoshop (sebbene anche altri programmi come Adobe Illustrator supportino i percorsi). Solo quando facciamo qualcosa con il tracciato, come riempirlo con un colore, applicare un tratto o convertirlo in una selezione, il tracciato diventa qualcosa di più di un semplice contorno non stampabile di una forma.
Abbiamo visto quanto sarebbe facile usare lo strumento Penna per selezionare qualcosa come un segnale di stop, delineandolo con un tracciato costituito da una serie di segmenti di tracciato rettilineo e trasformando il tracciato in una selezione. È fantastico, ma in realtà non abbiamo ancora fatto nulla che non avremmo potuto fare più facilmente con qualcosa come lo strumento Lazo o, meglio ancora, lo strumento Lazo poligonale che è stato costruito appositamente per selezionare forme a faccia piatta come la nostra fermata cartello. Le probabilità sono, a meno che tu non abbia uno strano fascino per i segnali stradali, prima o poi vorrai selezionare qualcosa di un po 'più interessante, e per "interessante" intendo più impegnativo. E per "sfida" intendo qualcosa che contiene curve. La selezione di un oggetto curvo in Photoshop avviene di solito quando ti ritrovi a perdere tutto il rispetto per gli strumenti di selezione di base. Fortunatamente, capita anche di essere il momento in cui lo strumento penna brilla davvero!
Prima di continuare, dovrei sottolineare che tutto ciò che abbiamo fatto fino a questo punto è stato piuttosto semplice. Fai clic qui, fai clic lì, converti il percorso in una selezione, fatto. La prossima parte in cui entreremo nel disegno delle curve non è così semplice, anche se non è certamente difficile, ma se questa è la prima volta con lo Strumento Penna o non hai molta esperienza con esso, lavorare con le curve può sembrare un un po 'innaturale e anche un po' travolgente. Questo è sicuramente il punto in cui entra in gioco l'analogia "in sella alla bici". All'inizio potresti cadere un paio di volte e chiederti come qualcuno riesce a farlo, ma più ci si allena e più ci si attacca, più ha senso tutto inizia a fare. In pochissimo tempo, ti sembrerà una seconda natura e improvvisamente capirai perché così tante persone giurano che lo Strumento penna è il più grande strumento di selezione in Photoshop! Davvero, lo è davvero.
Ottenere una maniglia su maniglie di direzione
Ricominciamo con lo strumento Penna. Apri un nuovo documento Photoshop vuoto o semplicemente elimina ciò che hai fatto finora nel documento esistente in modo da ricominciare da capo. Quindi con lo strumento Penna selezionato e l'opzione Tracciati selezionati nella barra delle opzioni (ricorda, per impostazione predefinita è l'opzione Livelli forma, quindi dovrai assicurarti di avere selezionata l'opzione Tracciati), fai clic una volta in qualsiasi punto all'interno del documento, proprio come abbiamo fatto prima. Questa volta, invece di fare clic per aggiungere un punto di ancoraggio, fai clic e trascina il mouse a breve distanza dal punto di ancoraggio prima di rilasciare il pulsante del mouse:
Fare clic in un punto qualsiasi all'interno del documento con lo strumento Penna, quindi trascinare a breve distanza dal punto di ancoraggio.
Al termine, vedrai un punto di ancoraggio con due linee che si estendono da esso. A prima vista, potresti pensare che in qualche modo siamo riusciti a trascinare un tracciato con lo Strumento Penna. Dopotutto, sembra che abbiamo tre punti di ancoraggio, uno su entrambe le estremità e uno al centro, con due segmenti di percorso che li collegano. Se guardiamo un po 'più da vicino, possiamo vedere che i punti su entrambe le estremità sono un po' più piccoli di quello al centro e che in realtà hanno una forma diversa. Quello al centro è quadrato e, come abbiamo visto, un punto di ancoraggio è quadrato, ma quelli su entrambe le estremità sembrano a forma di diamante. Alcuni punti di ancoraggio sono quadrati e alcuni a forma di diamante?
No. Tutti i punti di ancoraggio sono quadrati e hanno tutte le stesse dimensioni, il che significa che quei punti più piccoli a forma di diamante alle estremità non sono punti di ancoraggio. E se non sono punti di ancoraggio, ciò significa che le linee non sono segmenti di tracciato, poiché abbiamo bisogno di almeno due punti di ancoraggio per creare un tracciato e in questo momento l'unico punto di ancoraggio che abbiamo è quello nel mezzo. Quindi quali sono esattamente quelle linee che si stanno estendendo dal punto di ancoraggio? Sono maniglie di direzione!
"Ah, maniglie di direzione!" tu dici. "Ora capisco!"
… … …………….
"Aspetta, no non lo so. Che diamine sono le maniglie di direzione?"
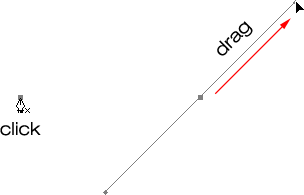
Le maniglie di direzione sono, beh, le maniglie e vengono utilizzate solo durante la creazione di segmenti di percorso curvi. Non è necessario utilizzare le maniglie di direzione durante la creazione di segmenti di tracciati diritti. Di solito ce ne sono due, anche se a volte ce n'è solo uno, e come abbiamo già visto, si estendono dai punti di ancoraggio. Si chiamano "handle" perché, come vedremo tra poco, puoi effettivamente afferrarli e spostarli.
Le maniglie di direzione controllano due cose. Controllano l'angolo della curva e controllano la lunghezza della curva, e lo fanno in modo molto accurato. Il motivo per cui di solito ce ne sono due è perché uno controlla l'angolo e la lunghezza della curva che arriva al punto di ancoraggio, e l'altro controlla l'angolo e la lunghezza della curva che fuoriesce dal punto di ancoraggio.
Prima di esaminare come disegnare le curve con le maniglie di direzione, vediamo innanzitutto come controllare le maniglie stesse, poiché il nostro successo nel disegnare le curve dipenderà molto dalla nostra capacità di controllare le maniglie. Non preoccuparti, non è, come si suol dire, scienza missilistica. Ci sono solo alcune cose semplici che devi imparare. Abbiamo già visto come creare maniglie di direzione, facendo clic con lo strumento penna e trascinando via dal punto di ancoraggio. Più lontano dal punto di ancoraggio trasciniamo, più lunghe saranno le maniglie di direzione. Più lunga è la maniglia, più lunga è la curva. Manico corto, curva corta. Manico lungo, curva lunga.
Una delle cose belle che imparerai abbastanza rapidamente sullo strumento Penna è che è estremamente tollerante. Non c'è motivo di preoccuparsi di sistemare le cose la prima volta quando si tracciano percorsi con esso perché possiamo tornare indietro e sistemare le cose facilmente quando abbiamo finito! Hai posizionato un punto di ancoraggio nel punto sbagliato? Nessun problema! Spostalo dove serve! Vedremo come farlo tra un momento. Hai trascinato una maniglia di direzione nella direzione sbagliata? Non è un problema. Prendi la maniglia e ruotala nella direzione desiderata. Ancora una volta, vedremo come farlo. Una delle tue maniglie di direzione è troppo lunga o troppo corta? Nessun problema. Basta fare clic su di esso e trascinarlo più a lungo o più corto in base alle esigenze (sì, vedremo anche come farlo). I percorsi sono completamente modificabili in ogni momento, quindi non c'è assolutamente motivo di preoccuparsi di fare un errore o risolverlo la prima volta. Non ti fa già sentire un po 'meglio?
Maniglie di direzione rotanti e ridimensionanti
Come ho già detto, si chiamano "maniglie" di direzione perché puoi afferrarle come maniglie e spostarle. Vediamo come farlo. Innanzitutto, vedremo come ruotare entrambe le maniglie contemporaneamente. Utilizzando il punto di ancoraggio e le due maniglie di direzione che abbiamo già creato, tieni premuto il tasto Ctrl (Win) / Command (Mac). L'icona dello strumento penna si trasformerà temporaneamente nell'icona dello strumento selezione diretta (la freccia bianca) e questo perché con lo strumento penna selezionato, tenere premuto "Ctrl / Comando" diventa una scorciatoia rapida per accedere temporaneamente allo strumento selezione diretta che è ciò che usiamo per selezionare diverse parti del nostro percorso. Quindi fai semplicemente clic direttamente sulla piccola forma di diamante alla fine di una delle maniglie di direzione (facendo clic sulla "linea" stessa non funzionerà, quindi devi sempre fare clic sulla forma di diamante alla fine di una maniglia per fare qualsiasi cosa con esso) e trascinarlo attorno al punto di ancoraggio per ruotarlo. Mentre ruoti una delle maniglie, l'altra maniglia ruota insieme ad essa nella direzione opposta, un po 'come una sega. Potresti anche notare che non appena inizi a trascinare la maniglia, l'icona del cursore del mouse cambierà ancora una volta, questa volta sull'icona Sposta strumento, poiché stiamo spostando qualcosa da un punto all'altro:
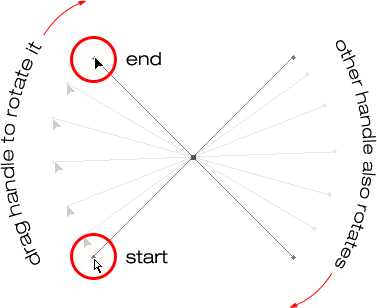
Tieni premuto "Ctrl" (Win) / "Command" (Mac) e fai clic sull'estremità di una delle maniglie di direzione, quindi trascina la maniglia per ruotarla attorno al punto di ancoraggio. Mentre trascini una maniglia, l'altra ruota nella direzione opposta.
Puoi rilasciare il tasto "Ctrl / Comando" una volta che hai iniziato a trascinare la maniglia. Non c'è bisogno di tenerlo giù per tutto il tempo.
Per ridimensionare una maniglia di direzione mentre la si sta ruotando, è sufficiente trascinare l'estremità della maniglia verso il punto di ancoraggio per renderla più corta o trascinarla lontano dal punto di ancoraggio per allungarla. Come accennato in precedenza, una maniglia più corta renderà la curva più corta e una maniglia più lunga allungherà la curva. Tuttavia, non è possibile ridimensionare entrambi gli handle contemporaneamente, quindi se è necessario ridimensionarli entrambi, è necessario trascinarli più o meno separatamente. L'unica cosa che puoi fare per entrambi contemporaneamente è ruotarli. Se hai già rilasciato il pulsante del mouse dopo aver ruotato le maniglie e il cursore è tornato all'icona dello strumento penna e devi ridimensionare una delle maniglie, tieni premuto nuovamente "Ctrl / Comando" per temporaneamente tornare allo strumento di selezione diretta, quindi fare clic e trascinare l'estremità della maniglia per ridimensionarla:
Trascina le estremità delle maniglie verso il punto di ancoraggio per accorciarle o allontanale dal punto di ancoraggio per allungarle.
Ora diamo un'occhiata a come ruotare le maniglie indipendentemente l'una dall'altra. To rotate one handle without affecting the other one, first release your mouse button if you've been rotating or resizing the handles so your cursor changes back into the Pen Tool icon. Then, instead of holding down "Ctrl/Command", which moves both handles at once, hold down your Alt (Win) / Option (Mac) key and click on the end of either of the direction handles. You'll see your cursor change into the Convert Point Tool icon, which looks like a simplified arrow made of only two lines, almost like an upside down letter "v" (except that it's not quite upside down). Then, simply drag the handle around the anchor point to rotate it, just as you did before, and this time, the handle will rotate independently of the other one, breaking the connection between them:
Hold down "Alt" (Win) / "Option" (Mac) and click on the end of either of the direction handles, then drag the handle to rotate it around the anchor point independently of the other handle.
Again, you can release your "Alt/Option" key after you've started dragging. You don't have to hold it down the whole time.
You can also resize direction handles using the "Alt/Option" key in exactly the same way as you can with the "Ctrl/Command" key. If you're in the process of rotating a handle, simply drag it in towards the anchor point to make it shorter or away from the anchor point to make it longer. If you've already released your mouse button and your cursor is showing the Pen Tool icon again, you'll need to hold down "Alt/Option" once again, then click on the end of the handle and drag it to resize it.
Is there a difference between resizing the handles using "Ctrl/Command" and using "Alt/Option" to do it? Yes there is. If you haven't yet "broken the connection" between the handles by dragging one independently of the other, resizing a handle using "Ctrl/Command" will keep the handles connected together. It won't resize both handles at once, but it won't break the connection between them either so you'll still be able to rotate them together if you need to. If you resize a handle using "Alt/Option", you'll break the connection between the handles. Even if you don't rotate the handle as you're resizing it, the connection will still be broken.
What if you've broken the connection between the handles by rotating them using "Alt/Option" and then want to rotate them together again? Can you "rebuild the connection", so-to-speak, by selecting one of them while holding down "Ctrl/Command" as before? Good question, and the answer is no. Once you've broken the connection between the handles, the "Ctrl/Command" key on its own won't bring it back. You'll need to select one of the handles while holding Ctrl+Alt (Win) / Command+Option (Mac) at that point in order to move the handles together again.
Quick Summary So Far …
We've covered a lot of information here about working with direction handles, so before we move on and start drawing some actual curves, let's do a quick recap:
- To add an anchor point, simply click with the Pen Tool.
- To add an anchor point with direction handles extending out from it, click with the Pen Tool, then drag away from the anchor point before releasing your mouse button. The further you drag, the longer the direction handles will be.
- To rotate the direction handles together, hold down Ctrl (Win) / Command (Mac), which will temporarily switch you to the Direct Selection Tool, then click on the end of either handle and drag it around the anchor point. The other handle will rotate in the opposite direction.
- To rotate the direction handles independently, hold down Alt (Win) / Option (Mac), which will temporarily switch you to the Convert Point Tool, then click on the end of either handle and drag it around the anchor point. The other handle will not rotate.
- To resize handles without breaking the connection between them, hold down Ctrl (Win) / Command (Mac) to switch to the Direct Selection Tool, then click on the end of either handle. Drag it towards the anchor point to make it shorter, or drag it away from the anchor point to make it longer.
- To resize handles and break the connection between them, hold down Alt (Win) / Option (Mac) to switch to the Convert Point Tool, then click on the end of either handle. Drag it towards the anchor point to make it shorter, or drag it away from the anchor point to make it longer.
- To rotate the direction handles together after breaking the connection, hold down Ctrl+Alt (Win) / Command+Option (Mac), then click on the end of either handle and drag it around the anchor point. The other handle will once again rotate with it.
Okay, that pretty much covers the basics of how to control the direction handles. Let's see how we can use them to draw some curves!
We've covered a lot of ground so far. We know about anchor points and direction handles. We know that in order to draw straight path segments, all we need to do is lay down a series of anchor points wherever we need them simply by clicking with the Pen Tool, and as we add more and more anchor points, we add more straight sections to our path. We know how to create direction handles and how to rotate them, either together or separately, and how to resize them.
We know how to turn a path into a selection by clicking on the "Load path as selection" icon at the bottom of the Paths palette or by simply pressing "Ctrl+Enter" (Win) / "Command+Return" (Mac) on the keyboard. One thing I didn't mention yet is that regardless of whether our path consists of straight lines,
curves, or a combination of straight lines and curves, converting it into a selection is done exactly the same way, and we've already learned how to do it, which means we're well on our way to mastering making selections with the pen! All we need to do is get a bit of practice drawing curves, which is exactly what we're about to do!
Stai ancora scorrendo? Scarica questo tutorial in PDF!
Drawing A Curve
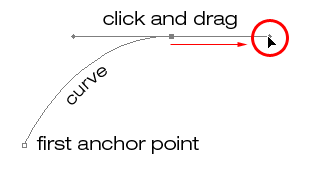
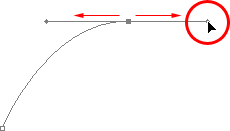
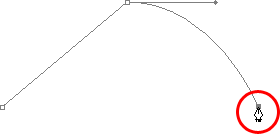
Let's once again start fresh, either by opening up a new blank document in Photoshop or by deleting what you've already done. We're going to draw our first curve so we can put all of our newly-aquired direction handle knowledge to use. First, with the Pen Tool selected and the Paths option selected in the Options Bar, click once somewhere in your document to add an anchor point. Just click, don't click and drag. You should have one single anchor point on the screen when you're done.
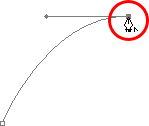
Then, move your mouse cursor up and to the right of your initial anchor point. Click again to add a second anchor point, but this time, drag your mouse a little to the right of the anchor point to drag out direction handles. Hold down Shift as you drag to constrain your movement to a horizontal direction. As you drag out the direction handles, you'll see your path appearing as a curve between the two anchor points! The further you drag your mouse, the longer you make the direction handles, and the more of a curve you create:
Click once to add an anchor point, then click and drag out a second anchor point with direction handles, creating a curved path segment between the two points.
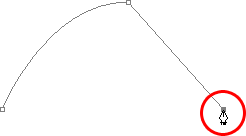
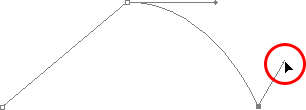
Click down and to the right of the second anchor point to add a third anchor point. This time, don't click and drag, just click:
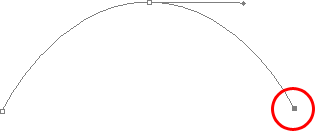
Add a third anchor point down and to the right of the second one by clicking with the Pen Tool.
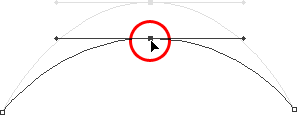
As soon as you add the third anchor point, a second path segment will appear, joining the second anchor point with the third one. And because our second anchor point has direction handles extending from it, this new path segment is also curved! We now have a nice, smooth arc starting from the first point on the left, then passing through the anchor point with the direction handles up top, and coming to an end at the third point.
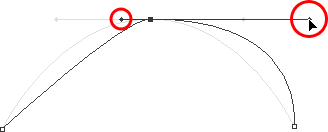
One thing you may have noticed, and you can see it in the screenshot above, is that when you added the third anchor point, the direction handle extending out the left side of the second anchor point disappeared. It's still there, Photoshop simply hid it from view. To see it again, use the keyboard shortcut we've already learned to temporarily switch to the Direct Selection Tool, which is by holding down the Ctrl (Win) / Command (Mac) key, and then click on the second anchor point to select it. As soon as you do, the missing direction handle reappears as if it was there the whole time (which it was):

Hold down the "Ctrl" (Win) / "Command" (Mac) key to temporarily switch to the Direct Selection Tool, then click on the top anchor point to select it. The missing anchor point reappears.
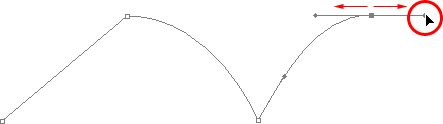
With your "Ctrl/Command" key still held down so you still have access to the Direct Selection Tool, try resizing each direction handle by clicking on the end of each one to select it and then dragging it towards and away from its anchor point. Again, hold "Shift" as you drag to constrain your movement horizontally, and watch what happens. As you increase the length of a handle, you get more of a curve, and as you decrease its length, you get less of a curve. Also notice that each handle controls its own side of the curve. The handle on the left controls the curve coming into the anchor point from the left, and the handle on the right controls the curve flowing out from the anchor point on the right.
Here, I've made my handle on the left shorter, and as we can see, there's much less of a curve now than there was originally, almost becoming a straight line. I've also made the handle on the right longer, and as a result, the curve on the right is now much more pronounced. The faint curve is the original for comparison:
Change the shape of the curves by resizing the direction handles. The left handle controls the left curve, and the right handle controls the right curve.
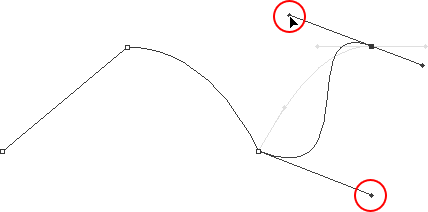
I'm going to undo my changes by pressing Ctrl+Alt+Z (Win) / Command+Option+Z (Mac) a couple of times to set my direction handles back to their original sizes so they're equal length once again. Now let's try rotating the handles. Hold down "Ctrl/Command" once again to access the Direct Selection Tool, then click on the end of either handle to select it and try rotating it around the anchor point. Since we selected the handle with "Ctrl/Command", both handles rotate together. Here I've dragged my left handle down and to the right, and the angle of the curve on the left changed along with it, now appearing as more of a slope as it rises up towards the anchor point. By dragging the left handle down and to the right, I caused the right handle to rotate up and to the left, and again, the angle of the curve on the right changed along with it, now rising above the anchor point briefly before making a steep decent down to the anchor point on the right. Again, the faint curve is the original for comparison:
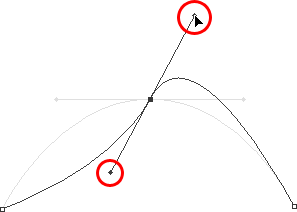
Rotate the direction handles to change the angle of the curves. Select a handle while holding "Ctrl" (Win) / "Command" (Mac) to rotate both handles together.
The Dreaded "Loop"
One thing you want to avoid is rotating the handles too far, which will cause your path segments to overlap and create loops. Here, I've rotated my handles all the way around so that the left handle is now on the right and the right handle is on the left, and notice what's happened. My path segments are now overlapping each other, creating a loop:
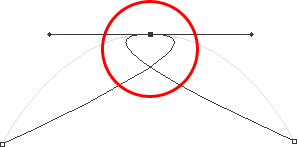
Rotating the direction handles too far causes the path segments to overlap, creating an unwanted loop in the path.
Loops can be caused by rotating the direction handles too far, as I've done above, but more often than not, they're caused by a handle being too long, making the curve too long and causing it to overlap with itself. If that happens, which it does sometimes as you're drawing a path, simply shorten the length of the direction handle. Most people end up creating a whole bunch of loops in their path when they first start working with the Pen Tool, so don't think you're the only one. No need to panic or become frustrated though. As I said, the problem is most likely being caused by a direction handle being too long, and all you need to do is shorten the handle to "un loop" the loop!
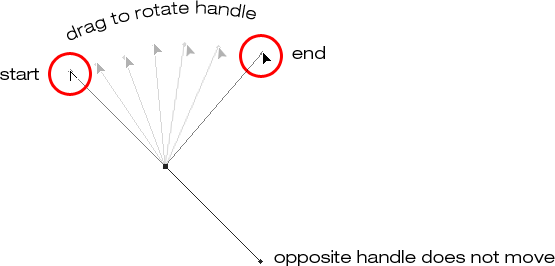
I'm going to press Ctrl+Alt+Z (Win) / Command+Option+Z (Mac) a few times once again to undo my changes and reset my path back to the nice smooth arc I started with. Now, what about rotating the direction handles independently of each other? As we learned on the previous page, to rotate the handles separately, instead of selecting them with "Ctrl/Command", we simply select them while holding down Alt (Win) / Option (Mac), which gives us temporary access to the Convert Point Tool. Click on the end of a handle to select it, then drag it with your mouse to rotate it and this time, the other handle will stay in place, breaking the connection between them.
Here, I've selected the handle on the right while holding "Alt/Option" and then rotated it down and to the left. Notice how once again, the angle of the path segment on the right changes to match the new direction of the handle, and this time, the handle on the left, along with the path segment on the left, both stay in place. My path now looks a bit like a shark fin:
Hold down "Alt" (Win) / "Option" (Mac) to temporarily access the "Convert Point Tool", then click on the end of a direction handle to select it and rotate it independently of the other handle.
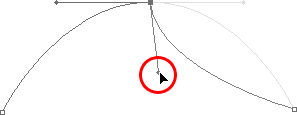
Moving An Anchor Point
One thing we haven't looked at yet is how to move an anchor point. If you recall, I mentioned on the previous page that the Pen Tool is extremely forgiving, and one of the reasons for it, besides being able to rotate and resize our direction handles after we've created them, is that we can easily move anchor points from one spot to another if we need to. As we've already learned, anchor points anchor a path into place. The anchor points themselves, however, are not anchored into place. You can move an anchor point anywhere, anytime, and any path segments that are connected to it will move and adjust right along with it.
To move an anchor point, hold down Ctrl (Win) / Command (Mac) to temporarily access the Direct Selection Tool as we've already been doing, then simply click on the anchor point to select it and drag it to its new location with your mouse. Any path segments connected to it will move with it to the new location. Here, I've dragged my middle anchor point down a bit from its original location (again, the faint path marks the original location for comparison). Notice how the path itself has changed shape to adjust to the new location of the anchor point:
Hold down "Ctrl" (Win) / "Command" (Mac) and click on an anchor point to select it, then drag it to a new location. Any path segments connected to the point will move with it, changing shape as needed.
Normally, when outlining an object with a path to select it using the Pen Tool, you won't need to move to an anchor point quite as far as what I've done above, but it's very common to go back around your path after you've created it and nudge a few anchor points here and there to fine-tune the path. Once you've selected an anchor point, you can nudge it up, down, left or right using the arrow keys on your keyboard.
Combining Straight Paths With Curves
What if I didn't want both of my path segments to be curves? What if what I needed was for the first path segment to be curved, but the second one needed to be straight? Vediamo come farlo. I'm going to delete my existing path and start over again. First, I'll click to add an anchor point to start things off. Then, just as before, I'll click to add a second anchor point up and to the right of my initial point, and this time, I'll drag out direction handles, which will create a curved path connecting the two points, giving me exactly what I had way up at the start of this page:
Click once to add an anchor point, then click to add a second anchor point and drag out direction handles to create a curve.
I now have my initial curve, but I want my next path segment to be straight. If I was to simply click somewhere to add another anchor point right now, I would get another curve because I have that direction handle extending out from the right side of the last anchor point I added. What I need to do is get rid of that one direction handle. Without a direction handle controlling the angle and length of a curve, we get a straight line.
To remove the handle, leaving only the handle on the left of the anchor point, all I need to do is hold down Alt (Win) / Option (Mac), which will again temporarily switch me to the Convert Point Tool, and then I just click directly on the anchor point. When I do, the direction handle on the right disappears, leaving only the one on the left:
Hold down "Alt" (Win) / "Option" (Mac) and click directly on the anchor point to remove the direction handle on the right, leaving only the one on the left.
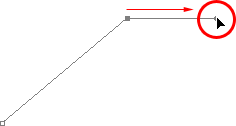
Now, with the direction handle gone, if I click to add a new anchor point, I get a straight path segment between the two points :
With the direction handle on the right now gone, clicking to add a new anchor point adds a straight path segment between the two points.
I now have a curved path segment on the left and a straight one on the right! What if I wanted the exact opposite? Suppose I needed to start with a straight path segment and then follow it with a curve? To do that, first I'll start by clicking to add an initial anchor point. Then, since I want a straight path segment, all I need to do is click somewhere else to add a second anchor point, and I automatically get a straight path connecting the two points:
Click with the Pen Tool to add an initial anchor point, then click again somewhere else to add a second anchor point and create a straight path segment between them.
I'm going to keep my mouse button held down after clicking to add my second anchor point because I want my next path segment to be curved, and we know that in order to create a curve, we need a direction handle. To add a handle extending out from the right of my anchor point, I'm going to hold down Alt (Win) / Option (Mac), and with my mouse button still down, I'm simply going to to drag to the right of the anchor point. As I do, a direction handle will drag out along with it:
Hold down "Alt" (Win) / "Option" (Mac) and drag out a direction handle on the right of the anchor point.
Notice that the direction handle extended only from the right of the anchor point, not from both sides, leaving my straight path segment on the left in place. And now that I have my direction handle on the right, all I need to do to create my curve is click to add a third point:
Click to add a third anchor point, which creates a curved path segment between the previous anchor point and the new one.
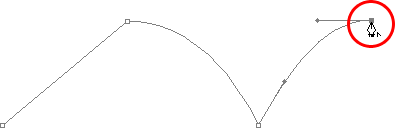
And there we go! I now have a straight path segment on the left, followed by a curved segment on the right. Of course, most paths you draw are going to consist of more than just three anchor points. Let's say I wanted to continue this path, moving in the same general direction towards the right, and I want my next path segment to be curved as well. Just as I did a moment ago, I would leave my mouse button held down after clicking to add my third point. I would hold down Alt (Win) / Option (Mac) and I would drag out another direction handle. So far, we've only been dragging handles out towards the right, but what you really want to do is drag your handles out in the general direction you want the curve to follow. I want to create a curve that goes up and to the right, so I'm going to drag out a small handle in that same general direction:
Drag out your direction handles in the general direction of the curve.
Mancia! A good practice to get into is to keep your direction handles small when first dragging them out, since you never really know how long or at what exact angle they need to be until the actual curve appears, and the curve doesn't appear until you've added both of its anchor points. Once you've added both points and the curve appears, you can easily go back and make any adjustments you need to the handles. You may even want to wait until you've drawn the entire path before worrying about adjusting the handles.
With my direction handle created, I'm going to click to add a fourth anchor point, and I'm going to drag out direction handles from it as well:
Adding a fourth anchor point along with direction handles extending from it.
I now have a third segment added to my path, this one being a curve. Notice that this curve actually has two direction handles controlling it, one extending from the right of my third anchor point and one extending from the left of my fourth point:

The third path segment now has two direction handles, one on either end, working together to control the curve.
The overall shape of this curve is now being controlled by the length and direction of both of these handles. Watch what happens to the curve when I move the handles. I'll drag the bottom handle down and to the right, and I'll drag the top handle up and to the left. I'll also drag both of these handles longer. The faint curve is the original for comparison:
Changing the direction and/or length of either handle changes the overall shape of the curve. After rotating and lengthening both handles, the curve now appears in an "S" shape.
The curve is now a bit "S" shaped, and that's because the bottom handle is controlling the angle and length of the curve as it flows out from the third anchor point, while the top handle is controlling the angle and length of the curve as it flows into the fourth point. Changing the length and/or direction of either handle will change the overall shape of the curve.
I'm going to press Ctrl+Alt+Z (Win) / Command+Option+Z (Mac) a couple of times to undo the changes I made, so the curve is once again in a simple arc shape as it was a moment ago, and I think I'll finish off this path with another straight segment, which means I'll need to remove that direction handle extending out from the right side of the fourth anchor point. We've already learned how to do that, by holding down Alt (Win) / Option (Mac) and clicking directly on the anchor point itself:
Hold down "Alt" (Win) / "Option" (Mac) and click directly on the anchor point to remove the direction handle on the right.
With the direction handle gone, all I need to do now to add a straight path segment is click to add another anchor point:
The direction handle on the right is now gone, so we can add a straight path segment simply by clicking to add another anchor point.
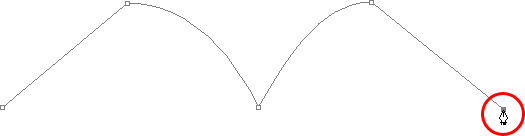
We could continue this path for as long as we wanted, adding more straight segments and curves, but I think we'll stop here because we've pretty much covered everything we need to know about drawing paths with the Pen Tool at this point. That was a lot of information to take in, especially if this is your first time learning about paths. As I mentioned at the beginning, you won't become a Pen Master simply by reading through this tutorial, just as you won't learn how to ride a bike, or drive a car, learn to swim, or play the piano simply by reading about it. But hopefully you have some sense at this point of how to draw paths with the Pen Tool, how to draw straight path segments, how to draw curves by dragging out direction handles, how to change the length and angle of the curve by rotating and resizing the handles, and how to combine straight and curved segments in a path.
To finish off our look at making selections with the Pen Tool, let's see a practical example of how to select an object with curves.
Here, we have a photo of a couple of dolphins leaping out of the water. Definitely a couple of very curvy creatures:

A photo of two dolphins jumping out of the water.
Let's say we want to select these dolphins so we can use them for a design or a collage, or whatever the case may be. If you were to try selecting them with the Lasso Tool, which is most likely what you would end up using if you didn't know how to use the Pen Tool, not only would you have a tough time, you'd have an even tougher time trying to convince yourself that you were happy with the results when you were done. The reason is because the Lasso Tool simply isn't capable of making curved selections very well. The biggest problem with it, besides being a pixel-based selection tool, is that it relies on you having a steady enough hand to move it smoothly around the curves. Even if you don't suffer from a caffeine addiction, you could drive yourself crazy trying to draw a perfectly smooth curve with your mouse, or even with a pen tablet, and when you've finally given up, you'll still be left with a selection full of rough, jagged edges that just scream "amateur!". No one likes to be called an amateur, especially when there's no need for it thanks to the Pen Tool!
Examine The Object First
Whenever you're about to select something with the Pen Tool, before you begin, take a moment to examine the object carefully to get a sense of where you're going to need to place your anchor points. Forget about all the details in the object and focus only on its shape. Where are the areas where the shape changes direction? Which parts of the shape are straight? Which parts are curved? If there's a curve, is it a smooth, continuous arc or does the angle change at a spot along the curve? Visualize in your mind where you're going to need to place your anchor points, because when you place one, you always want to be thinking about the next one and what the path segment between the two points needs to look like.
A Tool Of Elegance
One more thing to keep in mind is that the Pen Tool is meant to be a tool of elegance . It's not a nail gun or a staple gun. You don't want to just go clicking around your shape adding anchor points all "willy nilly" (that's a technical term). When using it to draw curves, you want those curves to be nice and smooth, otherwise we might as well just stick with the Lasso Tool. To keep the curves flowing smoothly, we need to limit the number of anchor points we use to create them. That's why you want to take a moment to examine the object first and visualize where the anchor points need to be. If you can outline a large section of the shape using only one curve with an anchor point on either end, that's what you want to do, because that's what's going to give you the kind of results you're looking for. The kind of results that scream "definitely not an amateur!".
Let's select these dolphins. I'm going to start my path in the middle of the photo, at the spot where the side of the dolphin on the left overlaps the rear flipper of the dolphin on the right. There's no right or wrong place to begin a path. This is just where I've decided to start. The first part of that rear flipper is straight, so since I don't need a direction handle to create a straight path segment, I'm simply going to click once with my Pen Tool to add my first anchor point, which will serve as the starting point for my path:
Adding the first anchor point.
As I mentioned earlier, you'll probably find it helpful to zoom in on your image as you're drawing your path. To scroll the image around on the screen as you're zoomed in, hold down the spacebar, which will switch you temporarily to the Hand Tool and allow you to move the image around on the screen by clicking and dragging it.
The top of that flipper actually has a slight curve to it as it approaches the dolphin's tail section, so for my second anchor point, I'm going to click at the point where the flipper and tail section meet, and I'm going to drag out short direction handles, dragging up and to the right in the direction that the tail section is moving. Notice that I've now created a slight curve along the flipper:
Adding the second anchor point and dragging out small direction handles to add a slight curve to the first path segment.
As I continue up along the tail, I can see that it stays straight for a short distance, followed by a curve to the right, so I'm going to click to add a third anchor point at the spot where the curve begins. This gives me a straight path segment between the previous point and the new one. I know there's a short direction handle extending out from the previous anchor point, which normally means that my new path segment will be a curve, not a straight section, but because the handle is so short and is also moving in the same direction as the path segment, there is no noticeable curve to it. Consider it a "mostly straight" path segment:
Clicking to add the third anchor point, creating a (mostly) straight path segment.
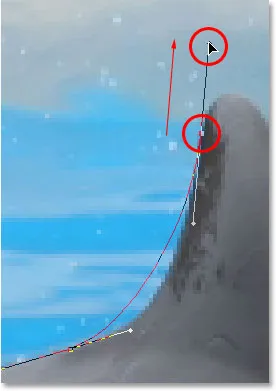
Continuing along, we come to the first real curve in our path. For this, I'm going to need to drag out a direction handle from the anchor point I just added, so I'm going to hold down Alt (Win) / Option (Mac), then drag out a handle in the general direction where I want the curve to flow as it starts. Notice how I'm only dragging out a handle from the one side of the anchor point, not both:
Hold "Alt" (Win) / "Option" (Mac) to drag out a direction handle from one side of an anchor point.
To add the curve, I'll click and drag at the spot where the curve ends, shaping the curve as I drag out the handles until it matches the curve of the dolphin's tail. If I needed to, I could also go back and change the length and direction of the handle at the start of the curve to fine-tune it, but in this case, I don't need to do that:
Adding an anchor point at the opposite end of the curve and dragging out direction handles from it, rotating and resizing them as needed until the curve matches the curve of the object.
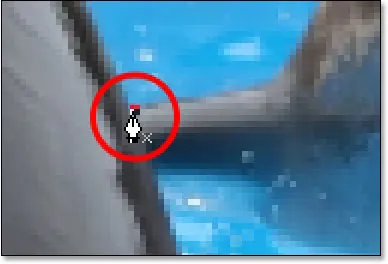
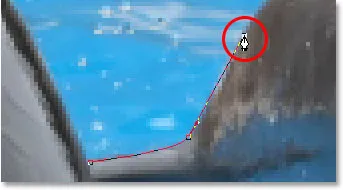
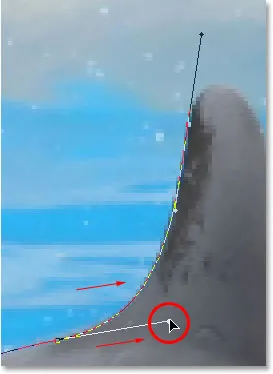
The next area of the dolphin is pretty straight, right up until its back begins to merge with its dorsal fin, at which point there's another curve, so I'm going to click to add an anchor point just before the curve up the dorsal fin begins, which is going to give me another "mostly straight" path segment between the previous point and the new point. Then I'm going to once again hold down Alt (Win) / Option (Mac) and drag out a direction handle as I prepare for my next path segment which will be curved:
Click to add an anchor point, then hold down "Alt" (Win) / "Option" (Mac) and drag out a direction handle to prepare for the next path segment.
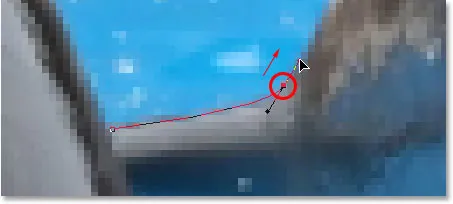
The left side of the dorsal fin consists mainly of one continuous curve upward until it gets near the very top, at which point the shape changes, so to create this curve, I'm going to click and drag at the point near the top where the curve will change direction. As we can see in the screenshot, this adds a curved path segment between the previous anchor point and the new one, but the curve is not yet following along the shape of the fin. It's going to need some fine-tuning:
Adding a curve along the left side of the dorsal fin. The curve still needs some adjusting.
To adjust the curve, I'm simply going to hold down the Ctrl (Win) / Command (Mac) key, which gives me temporary access to the Direct Selection Tool, and I'm going to drag the handle extending out from the bottom anchor point towards the right to lengthen it, which is going to pull the angle of the curve in towards the right along with it, lining it up nicely with the curve of the fin. I've also rotated the top direction handles slightly in a clockwise direction just to be nit-picky, but the majority of the adjustment was done using the bottom direction handle:
Adjust the curve by adjusting its direction handles.
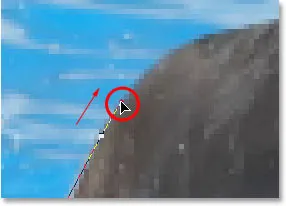
To add a curve around the top of the fin, I'll click and drag on the opposite side of it to add another anchor point with short direction handles. Notice though that we run into a bit of a problem. The direction handle on the left side of the curve is too long and it's pulling the curve away from the top of the fin:
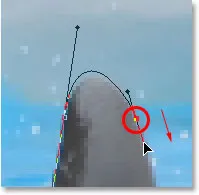
The direction handle on the left of the curve is too long, resulting in the curve not following the shape of the fin.
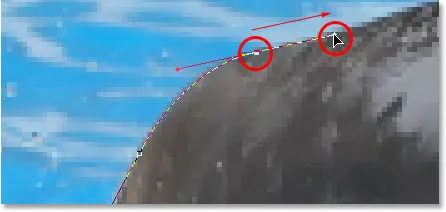
To fix that, all I need to do is once again hold down Ctrl (Win) / Command (Mac), then click on the end of the handle to select it and drag it shorter until the curve is the proper shape:
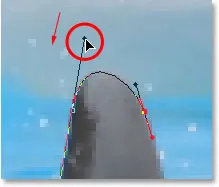
Shortening the length of the direction handle to adjust the shape of the curve.
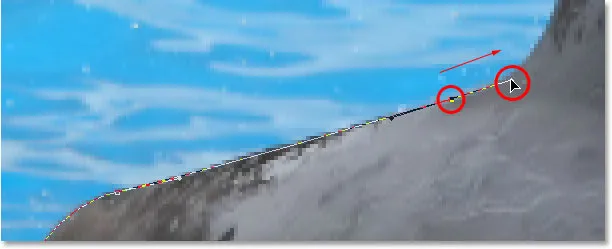
Let's finish creating our path around the dorsal fin. The remainder of the fin is basically a straight line, so I'm going to click at the base of the fin to add another anchor point which adds the straight path segment, completing our path around the fin:
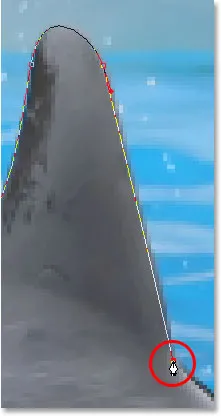
Adding an anchor point at the base of the fin to finish drawing the path around it.
Since you and I would both be here all day if I was to continue commenting on every anchor point, direction handle and path segment as we make our way slowly around the dolphins, and since we've covered everything we need to know at this point, I'm going to go ahead and draw the rest of the path, outlining both dolphins:
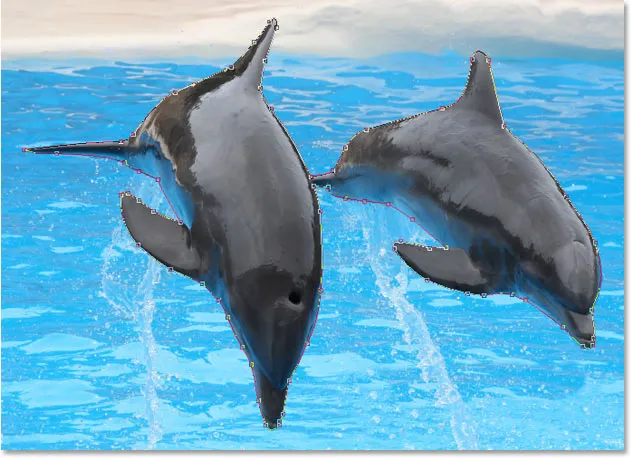
Both dolphins are now outlined by the path.
The dolphins have now been outlined with the path, and if we look at the Paths palette, we can see that sure enough, we have a path in the shape of the dolphins:
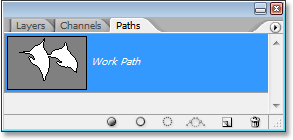
Photoshop's Paths palette showing the outline of the dolphins in the preview thumbnail.
As we've learned, Photoshop automatically names the path "Work Path", which means it's temporary and will be replaced if we start a new path. If you wanted to save it, you would need to double-click on the name "Work Path" and rename it to something else, like "Dolphins" in this case. I'm not going to worry about that, since I have no need to save it. All I want to do at this point is convert my path into a selection, and since I'm already in the Paths palette, I'll do that by clicking on the Load path as selection icon at the bottom of the palette:
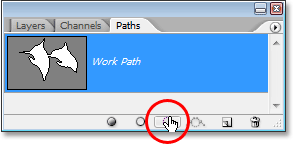
Clicking the "Load path as selection" icon at the bottom of the Paths palette.
I could also have used the keyboard shortcut Ctrl+Enter (Win) / Command+Return (Mac) . Either way converts my path into a selection, and if I look at my photo, I can see that my path has indeed become a selection around the dolphins:

The path around the dolphins has now been converted into a selection.
Dove andare dopo …
E lì ce l'abbiamo! The dolphins are now selected and ready for whatever plans we have for them. And with that, we wrap up our look at drawing paths and making selections with the Pen Tool in Photoshop! Per ulteriori informazioni sugli strumenti di selezione di Photoshop, consultare la sezione Come effettuare le selezioni nella serie Photoshop. Visita la nostra sezione Nozioni di base su Photoshop per ulteriori argomenti su Photoshop!